23 December 2015

Back together again

Received a replacement clip for the timing chain master link yesterday and got everything installed.

I've heard a couple different styles of getting the fish clip on the master link. Snowbum says install at 2 o'clock on the cam sprocket, Matthew Parkhouse says he uses 10 o'clock. Personally, since I had the oil pan off anyway, I moved the chain where the masterlink is at about 7 o'clock, pretty much centered in front of one of the holes that go into the engine. Then I took needlenose pliers, lifted the clip into the hole area because it gives you way more room to work, hooked the center of the clip around the forward-most pin, then and let the clip hang (closed end of the pin must be at the front of the rotation with the open end trailing). Doing this in front of the hole makes gives you more room to work with the clip around the pins than trying to use tweezers or surgical tools and fitting between the crank case, obviously if the oil pan is still on the bike these holes should be plugged up and you won't be able to do it this way. Then I rotated the engine so the chain was at about 10 o'clock on the cam sprocket. Doing so allowed gravity to do the work of centering the fish clip right above the second pin. At this point all it took was a slight adjustment of position using a thin screwdriver, and then using that same screwdriver to press downward and get the clip over the pins. I've heard some people using magnetic screwdrivers to do the job, but I found that the magnetic tip was trying to pull the rearmost spacer off, so I switch to a non-magnetic, normal, thin screwdriver.

Today I got everything wrapped up and started the bike. It definitely idles/runs much quieter. Still need to dial in the timing, but since it's raining for the next week here, I'm in no rush.


19 December 2015

BMW Timing Chain con't

Finally got the parts I needed in from Germany. While inspecting the crank sprocket I decided that it didn't need to be replaced. The bike indicates approx. 44k miles and there wasn't a huge difference between the new part and old. That being said...

The tensioner was well worn. I didn't realize how dramatic it was going to be until I compared it with a new one. 


That tensioner was so shot that I decided to drop the oil pan and see if there were any plastic bits laying around, luckily there were none. Don't know where the pieces went since I only saw very, very tiny bits of pieces in my filter last oil change.

Before assembling the parts, I realized that the Iwis chain I got came with two E-clips instead of the older style fish clip. I've heard horror stories about the e-clips showing up in pans many miles down the road, so it looks like I'll be ordering the older style from Max BMW. Then it'll be time to get everything back together.


05 December 2015

BMW Timing Chain Inspection

The last oil change I did on the R90/6, I noticed some very small, black, plastic looking stuff inside the filter. I assumed this was from the timing chain tensioner as that's the only plastic coated component that could possibly make it into the engine, the timing chain did also appear to rattle and slap a little when the bike was at idle. I figured I'd turn the inspection into an Airhead Beemer Club tech day as the dis-assembly process and subsequent re-assembly is a little more advanced than typical Airhead maintenance. I ordered a new duplex timing chain, crank sprocket, and tensioner (and all the other bits like gaskets, washers, and tensioner spring) from Germany and they haven't arrived yet, so for now it's just the inspection.

Here's the process:

Remove the exhaust headers, I leave the mufflers in place. Some guys say to remove the front wheel and forks to give yourself more room to work, but I also leave them on. Set the left piston to TDC (that's the position the crank will be in for the entire process), and then loosen the rocker arms to remove the spring pressure from the right cylinder head against the camshaft, this will prevent it from rotating the cam while you're working. Next REMOVE THE BATTERY GROUND and only after this do you remove the front cover to access the charging and ignition systems. Failure to do so can result in a fried system from the cover shorting against the diode board. After disconnecting all the electrical connections on the alternator, remove the three mounting bolts on the alternator, and then remove it. To remove the alternator rotor, you'll need a special hardened bolt that threads into the crank and pulls the rotor from the tapered crank nose. Then remove the camshaft nut and remove the advance and points plate. Diode board is also pretty straightforward.


I thought I could get away without removing the starter cover and just use needlenose pliers to remove the wire going to the starter solenoid, but I wound up removing it anyway. That red wire on the bottom goes through the timing cover and connects to the diode board, obviously I took this pic after the diode board was already removed.


While removing the socket head screws and nuts, I managed to strip the head on the last one I had to remove. After about an hour spent drilling it out, I was finally ready to remove the timing cover and inspect the timing chain. To remove the cover you need to use a heat gun to heat up the cover around the crank nose where it's an interference fit against the bearing below it. After about 3-5 minutes of heating, lightly tap on the cover and remove it, it should come out very easily, if not then you need more heat. Once removed, this is what you'll see.


My timing chain had plenty of slack in it. Besides that, the chain tensioner was worn and missing pieces of the plastic coating (what was getting trapped in my oil filter, as seen in the pic below). If you plan on removing the chain for replacement, first remove the spring for the tensioner by removing the nut pictured at about 3 o'clock in the picture above. Next, remove the tensioner by removing the securing circlip and sliding it off its pin. Timing chain is removed by large bolt cutters (or a dremel if you're so equipped). Be sure to plug up all the holes that go into the case with rags so no metal can make its way down (I do this even before removing the circlip). Ensure you're still at TDC (OT "Obertotpunkt" on the flywheel). You can do this by, obviously, checking the inspection hole, and making sure the timing marks on the sprockets line up. The one for the cam should be directly above the keyway for the woodruff key (both should be pointing at 12 o'clock) and the one for the crank should be at 6 o'clock, lining up with the mark on the cam (woodruff key slot should be positioned at 9 o'clock).


I'm not sure I'll be replacing the crank sprocket and bearing just yet, the teeth appear to be in pretty good shape. Once the new one I ordered arrives I'll have to compare the teeth, if any wear is noted I'll just replace it so I don't have to go back in and do this again.

19 November 2015

Stupid stuff

Called Millennium Technologies and got a quote for cylinder stripping and re-plating with Nikasil, cost seems very reasonable, may take care of that in the next couple weeks. Other than cleaning the heads and case, that's the only thing holding up engine reassembly.

The receipts for all the bottom end work done in the 70's indicated that the big con-rod ends were checked and serviced, and in my rush to attack the sludge trap I neglected to take any measurements. For shits and giggles I figured I'd check at the minimum the side clearance since it's the easiest to measure. Can't get any more middle of the road to spec (0.3mm-0.5mm) than that.


Also tried one more thing to free the oil drain plug on the sump before drilling it out. Thought outside of the box for once and put the plug in a vice, then used my body leverage to turn the pan instead of the rounded out plug. Immediate results.


Stupid plug


Threads saved


Now I'll have to find a replacement plug (or make my own). Going to turn it into a magnetic one using this idea from ThisOldTractor.com. What a great resource that site has been.
 

13 November 2015

Moto Guzzi V700 Sludge Trap

The Guzziology book says to just destroy the sludge trap plug when removing. They tend to be seized, besides being punched to further lock up the threads. My plug was punched in the 6 o'clock and 12 o'clock positions and was super seized. Allen key wouldn't free it, hammer impact driver wouldn't work, impact gun succeeded only in messing up the hex slot in the plug. My plug was stuck and I don't have a M22x1.25 tap to remove it, so I took it to the old timer machinist over the bridge to drill it out for me. $20 later I have a nice crank with very little stuck in the sludge trap.


I used a special factory tool to clean out the big pieces of sludge. Chemical cleaning with a brass brush will happen later.


Not bad for a utensil


12 November 2015

Digging into the Guzzi part IV - end

Had some time to completely finish stripping the Guzzi this morning, what a beautiful machine.

The brass drain plug was super seized. I tried using an impact gun on it, but all that did was round out the head. Next I ground down the edges to use my long 19mm wrench on it, and that couldn't break it. Since I'm going to be getting a new plug anyway and I needed the oil out, I drilled right through, drained the oil, and will be dealing with that plug later.


Sludgy...


Oil strainer, feed lines, and pump. Looking pretty clean.


 Oil pump gears look good too, but I'll still need to measure the lash to make sure it's still in spec.


Con-rod bearings. No scoring I can feel with my fingertips, but don't look fantastic either. I foresee Plastigauge in my future and possibly new bearings.


Cam and lifters look to be in great shape, not pitting or scoring.


Rear crankshaft bearing removal


The crank looks to be in excellent shape, webbing and pins show no scoring or visible wear


Sludge trap, and the reason I did all this work. Don't have time to open it up and clean it out today, so to be continued on whether or not the complete tear down was worth it.


Engine internals, it looks like there's a lot more than there really is


Next up is the eventual sludge trap cleaning, cylinder Nikasil plating, head cleanup and eventual reassembly.

31 October 2015

Digging into the Guzzi part III

Thanks to some found money, I opted out of fabricating my own special tools for the V700 and instead purchased some from MG Cycle. The flywheel/ring gear holder will obviously lock everything up to allow removal of the generator drive pulley, timing gears, and then ring gear, clutch, and flywheel removal. The other tool pulls the rear bearing carrier.


In action, using the 3-tooth part to hold the ring gear for the starter. The single tooth on the top is used later on, after the ring gear is removed, to hold the flywheel in place.


This pisses me off to no end. As mentioned previously, this bike had a lot of work done to it in the 70's. Apparently besides new cylinders, pistons, and a top end job, they also put in brand new clutch plates. What I don't get is, why the hell you wouldn't replace the transmission input seal while everything was apart. Because they didn't take that step, these brand new clutch parts are completely ruined by gear oil. Such an expensive waste...


Timing gears. You can just make out the scant timing markings between the cam gear (big) and the crank gear (small). These were wiping off when I put my finder on the gears, so I had to make my own new markings that were more obvious.


Took some white out for the time being, need to clean it up a little on the cam side, but it'd be hard to mess up alignment for timing now.


And this is where my work ended for today. Shockingly, I don't have a 26mm socket or box end wrench anywhere (in fact what I have goes up to 24mm, then skips to 27mm and up, so timing gear removal, and subsequent bottom end disassembly, will have to wait for another day.

29 October 2015

The Placebo Effect

I had an introspective moment today. After taking my 2007 VW out on a test run after changing the two accessory belts on it, the car just seemed to feel better. The car seemed to sound a little better and pull a little stronger. But here's the thing... The accessory belts control the AC compressor, water pump, and alternator, they do not affect performance, so to speak, and are perhaps one of the most mundane features on the staid 2.5L I5 engine. Not only that, the belts I was replacing, in all honesty, probably did not need changing (in fact, they're hanging in my garage in the event I'll need a quick emergency fix down the road). They didn't seem stretched, didn't seem cracked, but then again I didn't have THIS WASTE OF MONEY . I just had these new belts laying around from a previous part order to make it the $100 required for free shipping and figured with the car now 8.25 years old and approaching 80k miles, it was a responsible thing to do.

I've noticed a similar result when I do things like check valve lash on my motorcycles, even when they don't need any adjustment whatsoever, they feel better the next time I ride them. Same thing goes for oil changes. It's like there's some kind of subconscious worry that exists until things are verified or replaced, and once you can attest that yes, the exhaust rocker arm clearance really is .008," no there's not metal filings clogging up the engine oil filter (that did actually happen on my wife's Passat). Only then can you stop thinking about every little sound, creak, or rev and start enjoying the ride; or maybe it's just me. It probably is just me...

Maybe I'm the type of person that placebos will work well on, I should keep this introspective post in my back pocket should I ever develop cancer or something.

In other news, the company I work for awarded us safety bonus gift cards, which wound up being just enough money that I could buy Moto Guzzi special tools and spare myself the trouble of fabricating them. I should be getting the starter gear + flywheel holder along with a rear bearing puller in the near future, allowing me to go forward with the engine disassembly. More to come later.


20 October 2015

Digging into the Guzzi part II

I began disassembling the top end in anticipation for bottom end removal to access the sludge trap. So far everything I've seen confirms that this bike had a lot of work done to it in the 70's and then sat for 40 years, but there wasn't any mention of sludge trap cleaning on the receipt (just oil pan cleaning and oil pressure checking) and the wear on the rear drive makes me doubt this bike is only a 19k bike.

Ready for tear down


Bad shot of the crank and lifters. What you can't see if that everything looks super clean and fresh. When I pulled the lifters out there was absolutely no wear on them (I believe they were replaced when this bike last received service), cam also showed no pitting or marking. There was some side to side play at the connecting rods, but I'll have to see what's acceptable in the Guzzi world, by BMW standards this is way out of spec.


After a half hour, this is as far as I got. It looks like I'll need to fabricate special tools to proceed with the generator drive pulley and clutch/flywheel removal.


Generator bracket. I guess I'll need to weld this back together. I guess the previous owner didn't know when to stop tightening the upper clamp...


All wrapped up until next time.


10 October 2015

Digging into the Guzzi

Since I have receipts for work that included new pistons, cylinders, top-end job, connecting rod bushings, oil system check, and pretty much everything except for cleaning out the sludge trap, I figured I'd dig in a little to see if it was true.

Cylinders are the original chrome plated type. No signs of peeling, piston does look fairly new. Thinking I'll likely get the cylinders re-lined with Nikasil and keep the existing pistons to avoid the engine self destructing later.


More carbon on the heads than I expected to see. Exhaust valve looks a little recessed as well, will check compression later and take them into a machine shop if needed.


Engine separated from trans. Trans definitely leaking gear oil, starter appears to be in good shape with fresh grease on the bendix drive.


Rear splines at final drive, not good.


 Rear splines at hub, almost non-existent


This leads me to believe that the bike doesn't really have the 19k that was indicated on the odometer, far more likely 119k. Also, given the amount of work that was done to the top and bottom ends in the 70's, I assume this engine had a seizure at one point which makes me wonder about the condition of the sludge trap. Looks like I'll be diving in deeper. Don't know what I'm going to do about the rear drive just yet, it looks like you can still buy splines for the final drive portion, but not the rear hub.

28 September 2015

New Project: 1967 Moto Guzzi V700

Well, I wasn't looking for anything else to work on... The 57 BMW R60 has been cleaning out all the spare change I have in my pocket, and frankly I couldn't (read: can't) afford another project, but every once in awhile a deal turns up that's just way too good to pass up. In a situation that sounds like what a superstitious person would call fate, I was in the middle of doing the dishes when I suddenly had the urge to do a quick search on Craigslist. Doing so yielded a search result of "moto Guzzi for sale 1968," that was just put up hours before me searching. No real description except "nice project" and the following pic:


Usually I'd shy away from a project pictured as such, but looking around at what was there it looked pretty complete, and the price was such that there was minimal risk in taking it on, even if there wasn't a title. I called the guy immediately and told him I wanted to take a look at it as soon as possible, which turned out to be the afternoon of the next day.

This is what it looked like when I got there:


Looking more like a bike, looking more and more complete. I was checking out the Dell'orto SS1 Carburetors (which was the first clue this was really a 1967 model instead of a 68), the the Borrani record rims (free of bends and scarring), the engine that seemed to be free (or at least it moved a little when I put the driveshaft into the transmission and pulled a little), and was trying to hide my excitement at what I was seeing. Apparently the bike has undergone a top-end rebuild back in the 70's and for one reason or another the guy started to disassemble it in 1976 to chrome the frame and repaint and then just let it sit for 40 years!

I checked out the numbers and found the frame to match the title (again a major plus), but the engine was different. I know this isn't as big of a deal with motorcycles as it is with cars, but I wanted to do a little more research on the numbers before pulling the trigger. I told the guy I was really interested, his price was fair, but that I'd call him a little later after I checked out the issue with the numbers and some other things like working out delivery if I was going to buy it. I was warned there were more people interested and I thought I was going to lose the bike. Long story short, the numbers never matched from the factory (common on early V7 Guzzis apparently), based on the numbers it really was a 1967 model (and early 67 at that) and was just titled as a 1968 (likely when it was sold instead of when it was manufactured), and when I called to say I'd buy it, he said he'd deliver it if I paid the tolls and paid cash - no problem. Honestly, getting to that point was a little difficult because he was afraid of turning up and me robbing him, I was afraid of leaving a hefty deposit and him never turning up, in the end we both decided to trust each other and make it happen.

All the bits and pieces upon delivery. 3 seats (1 solo, 1 stock bench seat, 1 3/4 seat off of a Honda or something), fairing, Wixom saddlebags, tool boxes, side covers, all the tins, complete engine and trans, brand new gasket set, a VERY COMPLETE bike.


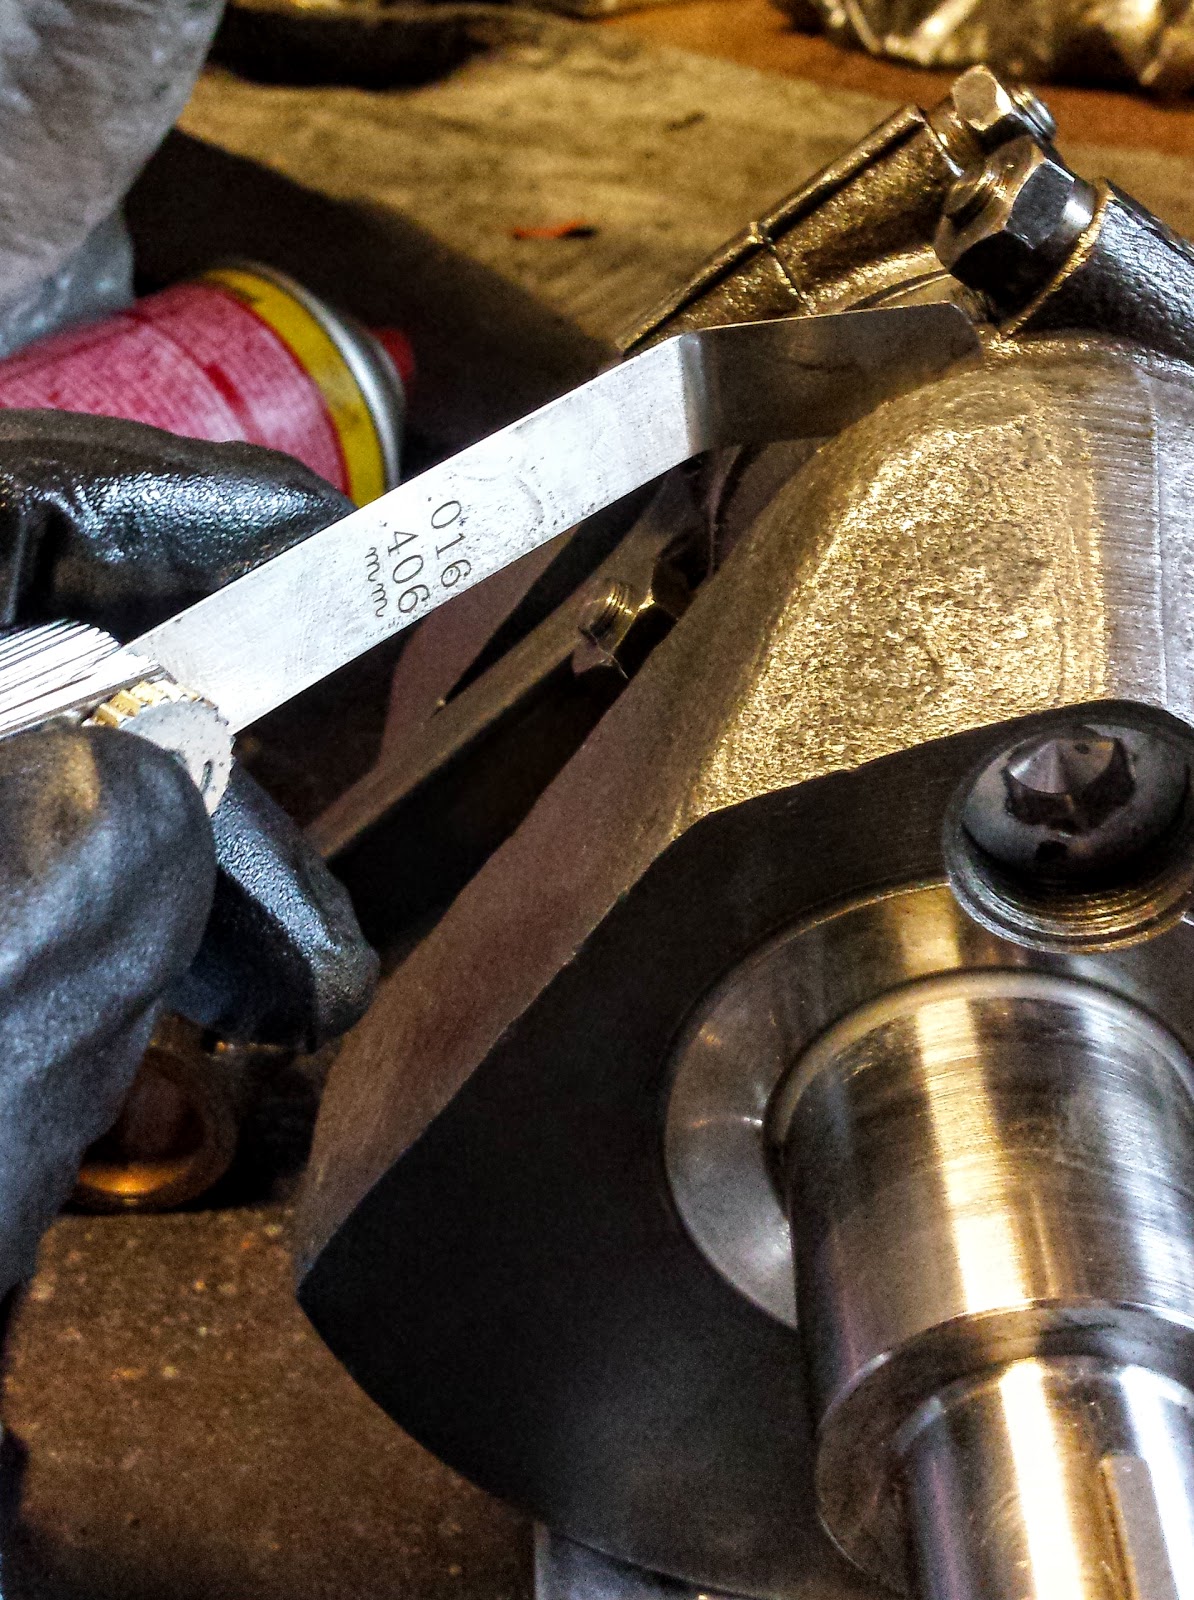
This was the icing on the cake. Like I said before, I was told the bike had undergone some top-end work in the 70's and was parked shortly thereafter. Well, the registration and inspection tags confirmed the latter, and this stack of receipts from the 70's confirmed the former. Complete top-end job, new con-rods, new pistons, this guy spent a lot of money and I can't believe he never really used it thereafter. Note: there is nothing on the receipts about the chrome-lined cylinders. Those will definitely need to be inspected before any start-up attempts on this bike.


Rockers look nice and clean. I was expecting a rusty mess and was very pleasantly surprised to find not even a speck of surface rust.


This is what the inside of a carburetor that's been sitting for 40 years looks like.


This is what it looks like after an overnight bath in B12 carb cleaner. Still can't get the idle jet off, or the jet carrier (which doesn't look like any others I've seen on an SS1 carb), but I'll get them, and then dip it all over again. The other carb is currently taking its turn in the chem bath. Also, the main jet looks nothing like anything I've ever seen before. you can see it in the middle of the picture at the bottom (to the right of the mixture screw/spring)l it had a spring attached to it leading to another jet with 4 outlet ports that sat up in the jet carrier. I'll have to see what the other side looks like when I disassemble it, but things don't seem quite right here...


I'm going to have to take some measurements and fabricate an engine stand before I finally move the engine and trans out of the milk-crate storage - then the real fun will begin.

20 September 2015

Ocean Grove Brits on the Beach 19 September 2015

Like every year, Brits on the Beach has been held on a day with perfect weather, excellent turnout, and fantastic cars. Unlike the previous years, this time motorcycles were also featured, and what a great, albeit small showing. There were repeats from prior years (you can find last year's photos here), but I'm not complaining, in fact, the only complaint that I have is that the show is definitely getting bigger (compounded by a 5k and Fair going on in OG at the same time) and it was a little harder to get good pics.

Asbury Park looking ominous in the morning fog.


This guy was taking the Spitfire thing pretty seriously


Vincent Black Shadow & Brough Superior SS100 both ridden to the show. You rarely see Vincents, never see Broughs, and when you do find one it's usually at a concours event, not ridden to a commoner's street show.


The 2nd British motorcycle contingent. Egli Vincent, new Norton 890, Norton Atlas, Triumphs, and a BSA flat track racer.


Marty brought over his fiance's Triumph, it's come a ways back from this Lucas Electric strike in 2014.


Morgans


 Some MG TDs. My grandfather had one back in the day, unfortunately by the time I came around it was long gone and replaced by an 84 Corvette.